Draw Image X Y Move Circle
In this tutorial you will acquire to draw with the Python Turtle module. Information technology'south a fun way to larn Python while discovering your creativity!
What is Python Turtle?
Python Turtle is a module that allows to draw complex pictures and shapes using an x-y plane and rotations clockwise or anti-clockwise. Information technology'southward a fun manner to kickoff practicing programming in Python and information technology provides two interfaces: a procedural one and an object-oriented ane.
Nosotros will describe several shapes using the Turtle module and by the end of this tutorial you will be comfortable with it and with multiple Python constructs.
Let'southward first drawing!
Basic Concepts about Python Turtle
Before drawing a shape we have to empathise the basic concepts used by the Turtle module to draw.
Think about the x-y plane and imagine that there is a cursor at position (0, 0) pointing in the direction of the positive 10 axis (position 1 in the picture beneath).
At this point you can use a Turtle function to move the cursor in the direction it'due south facing by a certain corporeality of pixels (position two in the picture below).
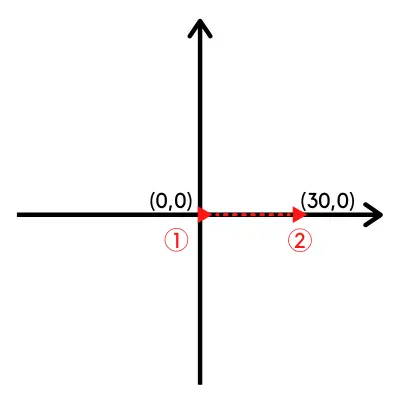
While moving, the cursor draws a line, so in this instance we would have a line that connects the points with coordinates (0,0) and (30,0).
You can identify the position of a point in the x-y plane by giving a specific value to x and y.
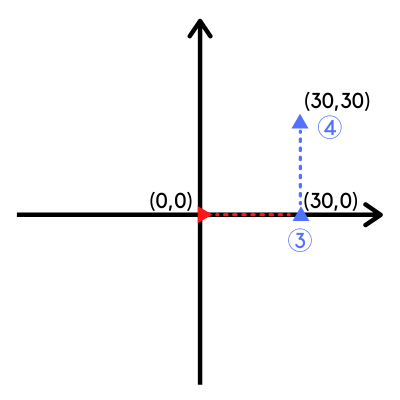
Now, if we want to draw a line in the direction of the y axis, that starts at position (thirty,0) and it'due south perpendicular to the 10 axis, we accept to rotate the cursor by 90 degrees anti-clockwise (position iii in the picture beneath).
The Turtle module provides a manner to do that before drawing the adjacent line.
Once you change direction for the cursor you tin can motion the cursor forrad and depict a 2nd line (position 4).
Using this principle y'all can describe as many lines every bit you want and rotating the cursor using any angle y'all prefer.
Allow'southward showtime drawing the get-go shape…
Drawing a Foursquare with Turtle
The first shape we volition draw is a square that:
- Starts at (0,0).
- Is inside the 1st quadrant (positive ten and y centrality).
- Has a 200 pixels side.
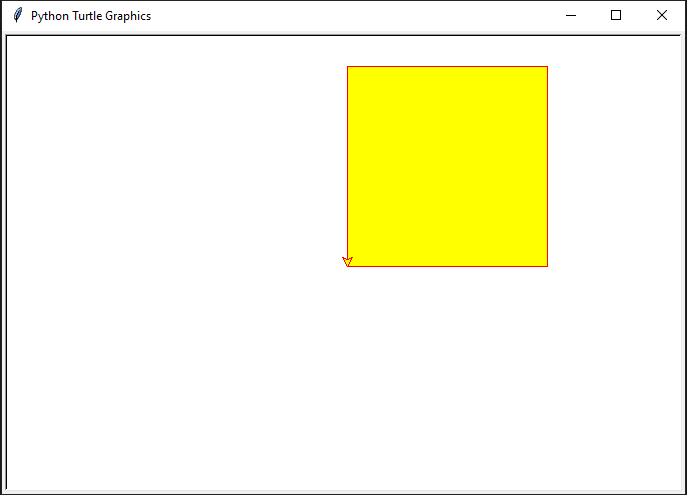
from turtle import * color('blood-red', 'yellow') begin_fill() forrard(200) left(ninety) forward(200) left(90) forward(200) left(90) frontwards(200) end_fill() washed() Let'due south get through the simple program to a higher place…
Subsequently importing the Turtle module we set the pencolor (for the edge of the shape) and the fillcolor (to make full the shape) using the color() function.
Here you lot tin can come across how pencolor and fillcolor are set when nosotros call colour() inside Python IDLE:
>>> from turtle import * >>> color('red', 'yellow') >>> pencolor() >>> 'carmine' >>> fillcolor() >>> 'xanthous' The functions begin_fill() and end_fill() are required earlier and afterward drawing a shape to be filled.
So look at the two functions frontward() and left()…
…what do they exercise?
The forwards() part moves the turtle (the cursor) past the specified number of pixels in the direction the turtle is pointing to.
In this instance the turtle points past default in the direction of the positive 10 centrality and so this command volition move information technology by 200 pixels along the 10 centrality (in the 1st quadrant).
The left() function turns (or rotates) the turtle anti-clockwise by a sure angle that by default is expressed in degrees.
That's why the second call to the forward() function draws a line perpendicular to the first ane (ninety degrees angle) and in the 1st quadrant.
With the same logic nosotros tin can draw the for sides of a square.
Here is the output…
Makes sense?
Code Refactoring Before Standing
Earlier moving to the next shape I'd like to refactor the previous lawmaking that contains lots of repetition (not a practiced thing for code in whatsoever language)
We will create a office that we can employ also when drawing other shapes.
from turtle import * def turn_and_draw(turn_angle, draw_pixels): left(turn_angle) forward(draw_pixels) color('ruddy', 'yellow') begin_fill() side_count = 0 while side_count < 4: pixels = 200 if side_count == 0: bending = 0 else: angle = xc turn_and_draw(angle, pixels) side_count += 1 end_fill() done() Nosotros have defined the function turn_and_draw() that first changes the direction of the turtle and so draws a line.
If nosotros don't want the turtle to turn (i.e. when we describe the first side of the square) we can laissez passer 0 degrees equally turn_angle (see the if else statement inside the while loop).
Let'south see how the code looks like if we want to depict the foursquare starting with the start side along the y centrality instead of the 10 axis.
The only matter that changes is the if else statement inside the while loop, that becomes:
... ... if side_count == 0: bending = ninety else: angle = 270 ... ... That's considering to draw the first side we rotate 90 degrees anti-clockwise (remember that by default the turtle points in the direction of the positive 10 axis).
Now, considering that in our function nosotros use the Turtle function left() to rotate, we accept to provide an angle of 270 degrees.
If you call back virtually it…we have to rotate anti-clockwise beyond three quadrants to reach the position we want (the same applies to the three remaining sides).
Non platonic, have a look at how you lot could better this function using also the right() Turtle office depending on what yous need…
Draw a Triangle with Python Turtle
Let'south utilize the function nosotros have created in the previous section to draw a triangle that starts at (0,0) and that has all iii sides of the same length (equilateral).
from turtle import * # Depict a triangle def turn_and_draw(turn_angle, draw_pixels): left(turn_angle) forward(draw_pixels) colour('bluish', 'orange') begin_fill() side_count = 0 while side_count < 3: pixels = 200 if side_count == 0: angle = 0 else: angle = 120 turn_and_draw(bending, pixels) side_count += 1 end_fill() done() Yous can see how handy is the role nosotros have created in the previous section.
Simply by changing the value of the bending we tin can draw a triangle instead of a square.
The value 120 for the rotation bending is due to the fact that an equilateral triangle has three lx degrees angles (and 180 – 60 = 120).

This is the effect of our creation 🙂
How to Draw a Star With Python Turtle
At present that nosotros have seen how to describe two basic shapes, we will create something more circuitous.
We will draw a 5 point star!
You will come across that actually, drawing a star has the same level of complexity as the other two programs we have seen and so far for the square and the triangle.
That's because the only two values we accept to change are:
- The number of lines to describe (the number of times we execute our while loop).
- The bending betwixt each line.
In a regular 5 point star the sum of the v angles is 180 degrees, so every angle will be 36 degrees.
Recall that for our rotation we will apply 180 – 36 = 144.
Here is the code:
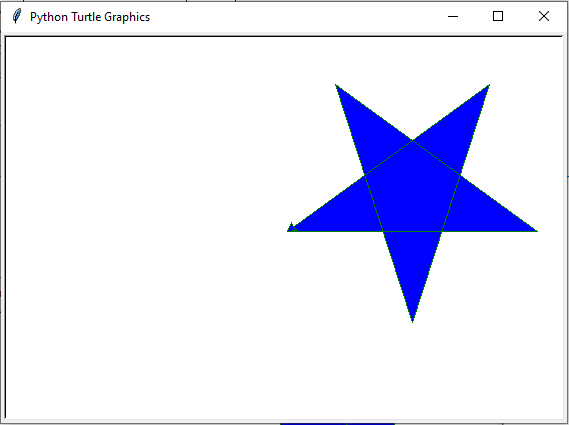
from turtle import * # Describe a star def turn_and_draw(turn_angle, draw_pixels): left(turn_angle) frontward(draw_pixels) color('dark-green', 'blue') begin_fill() side_count = 0 while side_count < 5: pixels = 250 if side_count == 0: angle = 0 else: angle = 144 turn_and_draw(angle, pixels) side_count += 1 end_fill() washed() And hither is our star…
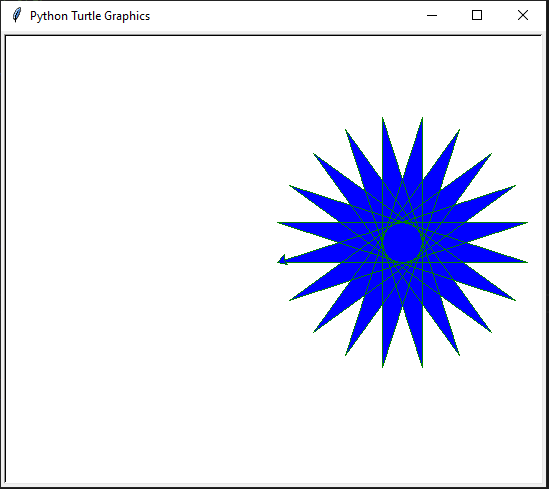
To draw unlike types of star we can simply update:
- The status of the while loop.
- The value of the angle in the else branch.
Here is what we go if we utilize the following:
... ... while side_count < 8: pixels = 250 if side_count == 0: angle = 0 else: angle = 162 turn_and_draw(angle, pixels) side_count += 1 ... ... 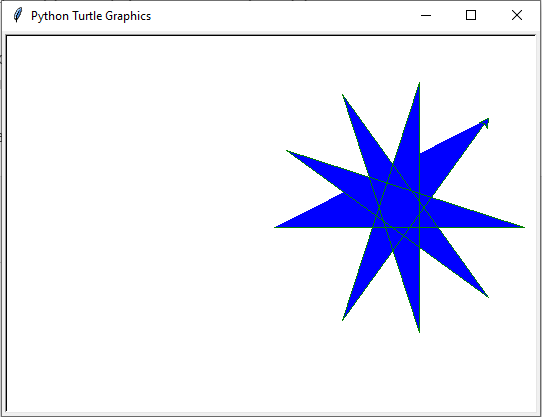
Drawing a More than Complex Star
I would like to describe a symmetric star with a lot more points to create a more than interesting effect.
Initially I have considered doing that by simply irresolute the status in the while expression of the previous lawmaking and considering a smaller bending betwixt each side of the star.
Merely somewhen, after few attempts with different values, I realised that it wasn't a viable approach.
Permit's endeavour something different…
I want to draw a star with multiple points and use as a condition to know that the star is complete the moment in which the turtle reaches the starting time signal of the star, in this case the origin of the x-y aeroplane.
To do this nosotros will use the pos() function that returns the current position of the turtle:
>>> pos() >>> (0.00,0.00) Have a look at the following Python code for the while loop (the rest of the code doesn't change):
... ... while abs(pos()) > 0.1 or side_count == 0: pixels = 250 if side_count == 0: bending = 0 else: angle = 162 turn_and_draw(bending, pixels) side_count += 1 ... ... I have kept the same value for the angle but the logic of the while loop has changed.
This time we draw lines until either side_count == 0 (for drawing the first line) or the absolute value of pos() is bigger than 0.1.
Basically, we want to cease drawing lines once nosotros have reached the origin over again…
The reason why I have used the number 0.1 in the while status instead of 0.0 is that I noticed that the absolute value of pos() is never zero when the origin is reached. It's a very small number, merely not nada.
Here is i of the numbers I got during my tests: two.206117911819664e-13.
And now…drum curlicue…here'southward what we accept drawn:
Quite absurd!
Draw a Circle with Python Turtle
Drawing circles is also something you lot might want to larn in order to create more complex shapes with Turtle.
To do that the Turtle module provides the circle() function. This role is very piece of cake to utilize, simply pass the radius of the circumvolve as statement:
from turtle import * # Draw a circle color('green', 'light blue') begin_fill() circle(100) end_fill() done() 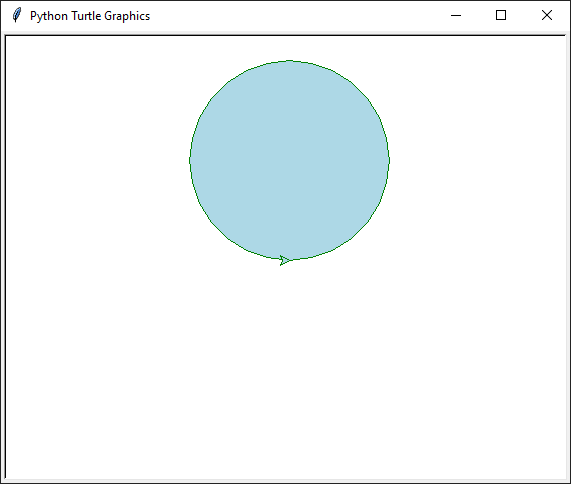
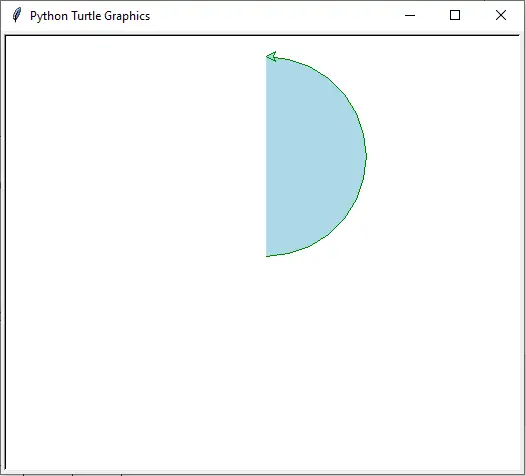
Y'all tin can also draw a partial circle by providing a 2nd pick argument (called extent) that is likewise an angle.
For example, to draw a semicircle we will requite extent the value 180.
The telephone call to the circle office becomes:
circumvolve(100, 180) And here is the semicircle:
It's time to put all this knowledge into practice!
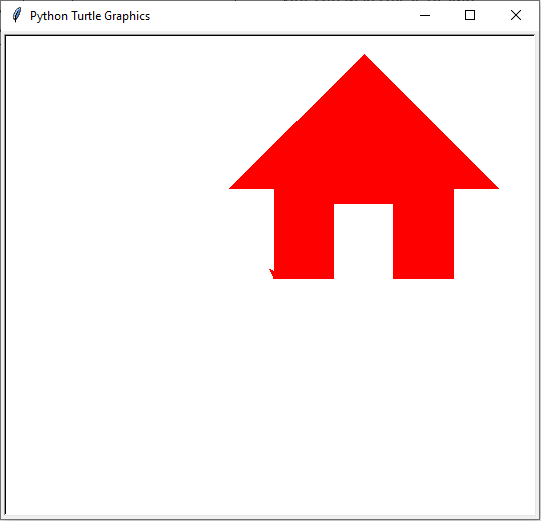
Depict a Firm with Python Turtle
A lilliputian coding challenge, permit'south run across if we tin draw a business firm using Turtle.
If you recall nearly it the principle is simple, we take to draw 7 lines and to plow the turtle passing the correct angle values before cartoon each line.
Let's give it a attempt…here is the result we want:

We will draw it using multiple calls to the turn_and_draw() function we take created before.
Also, nosotros will starting time cartoon the bottom role of the house from the usual position (0,0).
After a bit of tweaking, here is the code:
from turtle import * # Depict a house def turn_and_draw(turn_angle, draw_pixels): left(turn_angle) frontwards(draw_pixels) color('red', 'cerise') begin_fill() turn_and_draw(0, 60) turn_and_draw(ninety, 75) turn_and_draw(270, lx) turn_and_draw(270, 75) turn_and_draw(90, 60) turn_and_draw(90, 90) turn_and_draw(270, 45) turn_and_draw(135, 190) turn_and_draw(90, 190) turn_and_draw(135, 45) turn_and_draw(270, xc) end_fill() done() Endeavor it on your IDE and so yous can accept a articulate idea about the manner this is drawn.
And hither is our business firm, not bad 🙂
I have a minor claiming for you…
…try to refactor this code by using a Python for loop so you lot don't take to repeat calls to turn_and_draw() multiple times.
Permit me know if you have whatever questions about it 🙂
Irresolute the Cartoon Speed with Turtle
Before moving to the next section accept a expect at how you tin can change the drawing speed using the Turtle speed() office.
This function allows to gear up the speed to an integer value between 0 and 10. Here are some examples of values:
| Value | Description |
|---|---|
| 0 | Fastest |
| 1 | Slowest |
| 3 | Slow |
| 6 | Normal |
| 10 | Fast |
Before continuing endeavour to ready the speed to dissimilar values while you draw the house and find the difference.
For example, for the fast speed add the following line at the starting time of your plan (e.g. just earlier the color() function):
speed(10) Express Your Creativity with Python Turtle
And at present it's the time to express your inventiveness with Turtle.
Let'south create multiple shapes of dissimilar colours using the examples covered in this tutorial.
We volition depict the following:
- I five point star.
- Multiple circles inside each others and with a point in common.
- One complex star.
- A sequence of multiple isosceles triangles.
Considering that we want to depict a simple star first we volition first from the code we accept created for our first star.
But instead of using it the way it is, nosotros will practice some more refactoring to reduce duplication.
from from turtle import * # Draw a circuitous moving picture fabricated of multiples shapes def turn_and_draw(turn_angle, draw_pixels): left(turn_angle) forrard(draw_pixels) def draw_generic_shape(turn_angle, draw_pixels, num_of_sides): begin_fill() side_count = 0 while side_count < num_of_sides: pixels = draw_pixels if side_count == 0: angle = 0 else: angle = turn_angle turn_and_draw(angle, pixels) side_count += one end_fill() def draw_star(x, y, *colors): goto(x,y) colour(*colors) draw_generic_shape(144, 250, 5) # Get-go cartoon draw_star(0, 150, 'green', 'blue') done() I have converted the part of the code that contains the while loop into a function called draw_generic_shape().
This part is called by the part draw_star() that earlier drawing moves the turtle to the position (x,y) using the goto() Turtle function.
Observe how the draw_star() function is using *colors to read the value of the colours to utilize. If you lot want to know more about it have a await at this commodity about *args and *kwargs in Python.
Now, let's add a method to draw multiple circles:
def draw_circles(ten, y, *colors): goto(10, y) colour(*colors) begin_fill() for x in range(6): circle(x*25) end_fill() This time instead of using a while loop we are using a Python for loop.
The code is self-explanatory.
Let's run it, nosotros will call the draw_circles() function with the following arguments:
draw_circles(0, 0, 'blue', 'yellow') Find how we take changed the value of y to make sure the circles don't overlap with the star.
The Penup() and Pendown() Functions in Turtle
This is the cartoon yous will see when yous run the code:
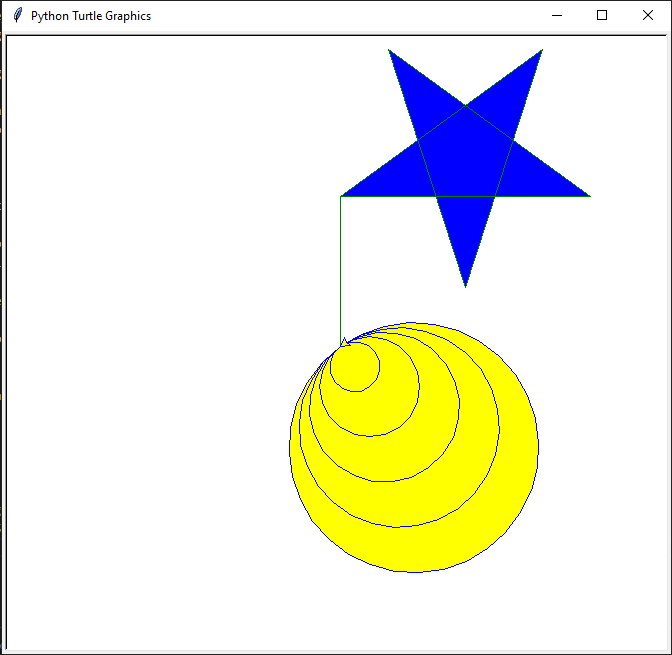
Information technology looks proficient except for the fact that in that location is a connecting line betwixt the star and the circles.
Why?
That's considering Turtle assumes that lines have to be drawn unless we tell it otherwise using the penup() function.
The penup() function pulls the pen upwardly, this means that no line is drawn while the turtle moves. To go dorsum to cartoon Turtle provides the pendown() function.
We will add together the penup() and pendown() function calls before and after the phone call to goto(x, y) in each function where is present.
For example, the draw_star() function becomes:
def draw_star(x, y, *colors): penup() goto(10,y) pendown() color(*colors) draw_generic_shape(144, 250, v) Earlier standing run your code and confirm that the connecting lines between the shapes are not present anymore.
Adding a Complex Star to Our Limerick
We will reuse the same values used earlier to describe the circuitous star.
So, create a new office called draw_complex_star(). Nosotros will make a small modify in the while condition that detects when it's time to cease cartoon.
This change is based on the fact that this time we don't showtime drawing the star from the position (0,0) in the way we accept done in the previous instance.
Here is the function:
def draw_complex_star(x, y, *colors): penup() goto(x,y) pendown() color(*colors) begin_fill() side_count = 0 initial_position = pos() while abs(pos()) > abs(initial_position) + 1 or side_count == 0: pixels = 250 if side_count == 0: bending = 0 else: angle = 162 turn_and_draw(angle, pixels) side_count += 1 end_fill() And the call to this function is:
draw_complex_star(-150, -150, 'green', 'cherry') Curious to see how our limerick is so far?
Wait a little bit more than, let's describe the triangles first…
Drawing Isosceles Triangles with Python Turtle
To add isosceles triangles to our drawing we can use the office draw_generic_shape() that we have defined before.
Have a look at the logic to create the triangle in one of the previous sections if you don't remember it.
Hither is the new function nosotros will define:
def draw_triangle(x, y, *colors): penup() goto(x, y) pendown() color(*colors) draw_generic_shape(120, 200, iii) But…
One difference compared to the previous case is that the previous triangle was equilateral (all three sides had the same length) while this time nosotros want to draw isosceles triangles.
This means that we cannot use the draw_generic_shape() function, we have to ascertain a dissever function.
For this example nosotros will use isosceles triangles that have two 72 degrees base angles. This means the third angle is 36 degrees (the sum of the angles of a triangle is 180 degrees).
Here is our part:
def draw_triangle(ten, y, *colors): penup() goto(x, y) pendown() colour(*colors) begin_fill() side_count = 0 while side_count < 3: if side_count == 0: pixels = 125 angle = 0 elif side_count == 1: pixels = 200 angle = 108 else: pixels = 200 bending = 144 turn_and_draw(angle, pixels) side_count += 1 end_fill() Think that in isosceles triangles ii sides have the aforementioned length (the ones fatigued for side_count equal to one and ii in the while loop).
Here is how nosotros can phone call the role in a higher place to draw i triangle:
draw_triangle(-150, 150, 'yellow', 'dark-green') To telephone call multiple triangles we will use a for loop and the range function:
def draw_triangles(ten, y, *colors): for count in range(1, 5): setheading(0) draw_triangle(-200*count/2, fifty*count/ii, *colors) We utilise the setheading() Turtle function to make sure the angle is set to zero before drawing every triangle (whatever initial angle different than zero would cause a rotation of the triangle).
Once again the values of x and y passed to the draw_triangle() function brand sure the triangles don't overlap with the other shapes fatigued before.
Beneath you lot tin can see the calls to all the functions:
# Start cartoon speed(ten) draw_star(0, 150, 'green', 'blueish') draw_circles(0, 0, 'blue', 'xanthous') draw_complex_star(-150, -150, 'green', 'ruby-red') draw_triangles(-150, 150, 'xanthous', 'green') Notice that we are setting the speed to 10 considering that information technology can take a while to depict all the shapes.
And finally…
…this is the masterpiece we take created together!
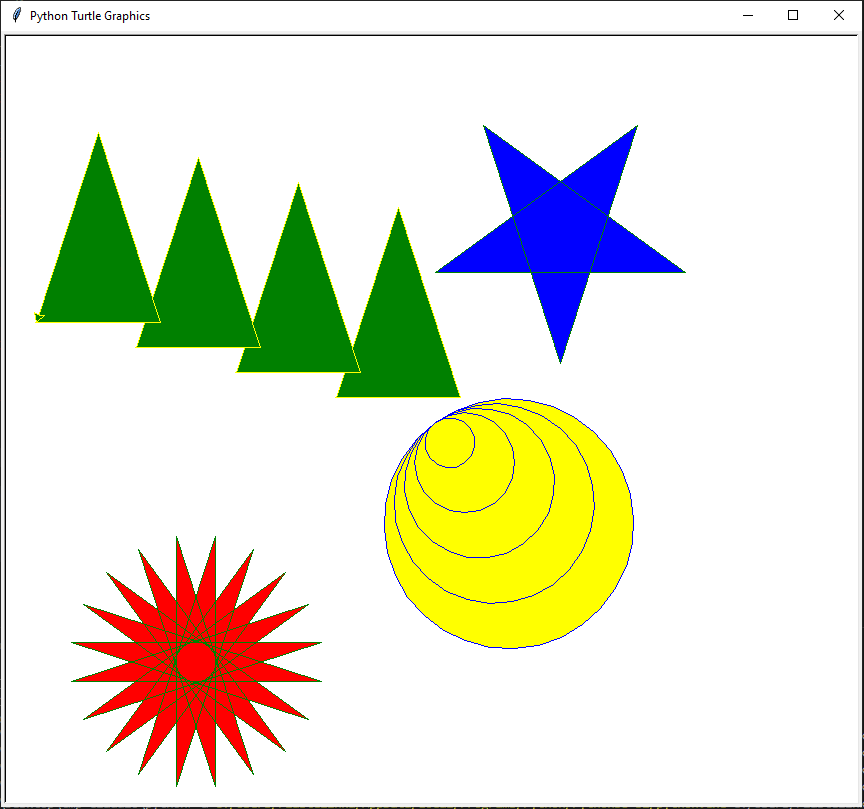
Pretty cool!
And this is just an case, y'all can create anything you lot want 🙂
Conclusion
We went through quite a lot in this Python tutorial:
- Starting from the basics of Turtle we take learned how to describe a square, a triangle and a five indicate star using several Turtle functions like forwards(), left() and color().
- After that we take seen how to use a more complex while logical expression to describe another interesting star shape. For that we have used the absolute value of the position returned by the pos() function.
- Then we have drawn a circle, a semicircle and a business firm. Every shape nosotros have drawn has been filled with a colour using the begin_fill() and end_fill() functions.
- We have too seen how to motion effectually the x-y plane with the goto() office.
And practise you remember which role accept we used to stop drawing lines while moving to a different position in the ten-y plane?
At present it's fourth dimension for you to create whatever you want with Python Turtle.
Download the full source code for this tutorial to shortcut your learning process.
Happy coding!
Related posts:
![]()
I'm a Tech Lead, Software Engineer and Programming Coach. I want to help y'all in your journey to become a Super Developer!
Source: https://codefather.tech/blog/draw-python-turtle/
Belum ada Komentar untuk "Draw Image X Y Move Circle"
Posting Komentar